

48 Cables, 1 Cable Manager: Routing and Patching in 9 Easy Steps
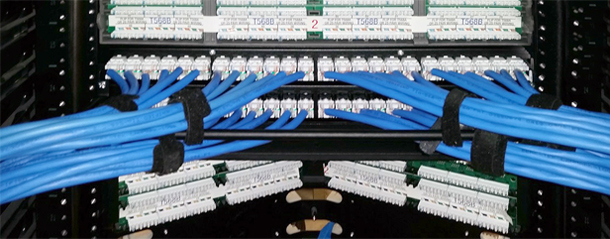
If you work in a high-density cabling environment, you've been here before. You're looking at a 2RU 48-port QuickPort patch panel fully deployed with 48 cables. You've got just one cable manager to keep chaos at bay. Will it be enough?
You can manage and dress all 48 of those cables using a single rear cable management bar and it's easier than you think. Follow these nine simple steps and you'll quickly bring order out of chaos.
- Split the cable bundle before routing it to the rack. Route the cable and connectors that will terminate to the right side of the panel down the right side of the rack. Route the cable and connectors that will terminate on the left side of the panel down the left side of the rack.
- Start with the bottom right row of patch panel ports. Seat the connectors of the first six terminated cables into the first six ports.
- Velcro the bundle of six cables to the bottom of the cable management bar and dress cables into the vertical cable manager on the right.
- Install and dress the next group of six in a similar fashion, taking them again to the right side of the vertical cable manager.
- Move to the left and install and dress the leftmost group of six cables first, then the final group of six on the bottom row of the patch panel.
- Route terminated cables to the top row of patch panel ports.
- Install the first six on the right and route the cables over the top of the cable management bar.
- Velcro this bundle in place to the top of the cable management bar and dress it into the vertical cable manager.
- Do the same with the next three top bundles.
What are your go-to cable management tips and tricks? Join our discussion on LinkedIn.
Recent Posts
Tags
Home (89)
Electrical (80)
Safety (59)
Networking (46)
Home Improvement (38)
Residential (34)
Data Center (31)
lighting (28)
Home Automation (28)
Energy Savings (24)
Fiber (24)
Dimmers (24)
Leviton (24)
GFCI (21)
receptacles (21)